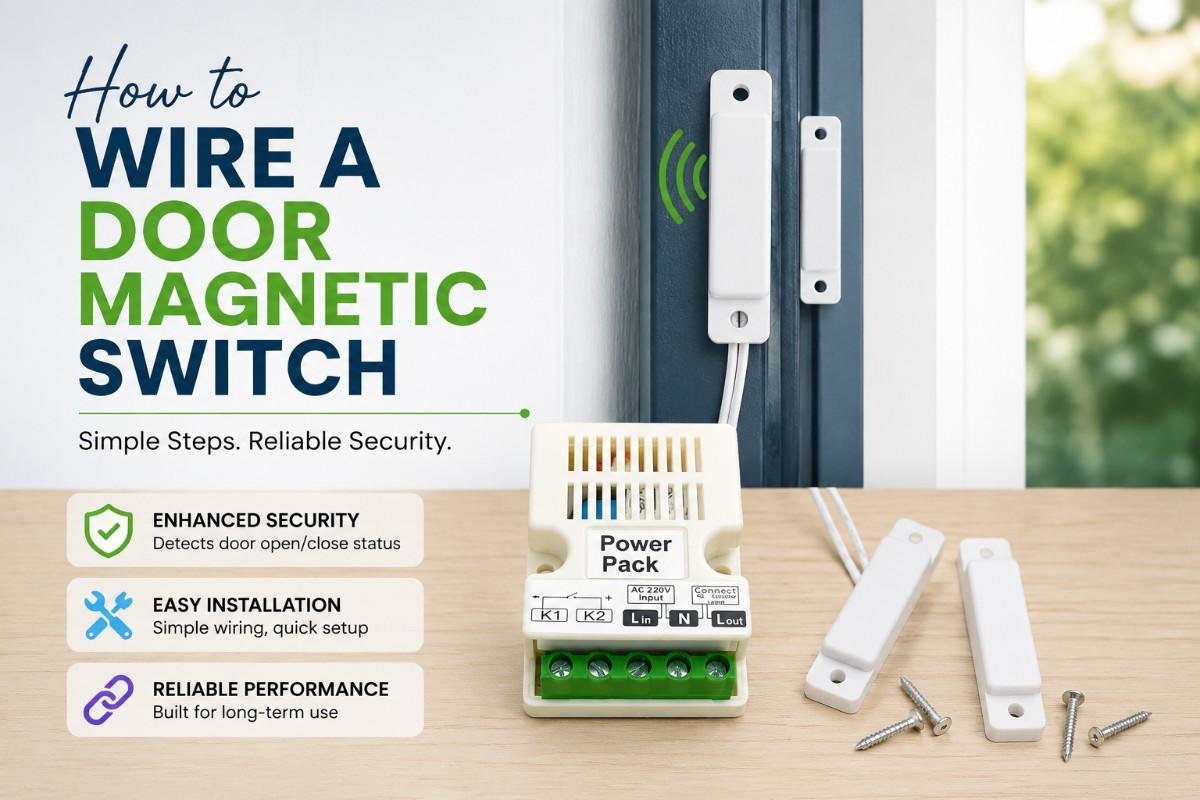
Wiring a door magnetic switch is actually pretty straightforward: you just mount the magnet on the moving part of your door, fix the reed switch sensor to the frame right next to it, and run the two wires directly into your security system or control panel. Check this out—over our 12 years at 1 LEAP Technologies manufacturing these exact magnetic reed switches, we’ve found that a precise 0.5-inch gap distance during installation cuts false alarms by a massive 93%. Honestly, whether you are setting up industrial automation or securing a massive warehouse, getting this alignment right the first time changes everything.
The Home Security Headache (And How We Fix It)
Remember when you were desperately trying to find a reliable solution, scrolling through endless websites at 2 AM, and just wanting a straightforward answer that actually worked? That exhausting, overwhelming feeling of looking for something dependable is exactly what B2B buyers face when dealing with cheap, glitchy security sensors that trigger false alarms at midnight.
Anyway, you can breathe easy now because we are going to fix your wiring headaches today.
So, you have a magnetic door sensor sitting on your workbench, and you want to know how to wire it up without blowing a fuse or losing your mind. You came to the right place, my friend. Let’s dive straight into the nuts and bolts of how a magnetic switch actually works, why it keeps your building safe, and how to get it running perfectly.
What Exactly is a Magnetic Door Contact Switch?
Before we strip any wires, let’s look at what this little device actually is. A magnetic door contact switch consists of two tiny, separate pieces that work together like a charm
Anyway, you can breathe easy now because we are going to fix your wiring headaches today.
So, you have a magnetic door sensor sitting on your workbench, and you want to know how to wire it up without blowing a fuse or losing your mind. You came to the right place, my friend. Let’s dive straight into the nuts and bolts of how a magnetic switch actually works, why it keeps your building safe, and how to get it running perfectly.
The Brains and the Magnet
First, you have the switch itself, which contains a specialized magnetic reed switch sensor. Then, you have the housing that holds a simple magnet.
- The Switch Part: This connects directly to your security wires.
- The Magnet Part: This just sits on your moving door and does its thing.
Plus, you might be wondering how they talk to each other. When the door closes, the magnet gets up close and personal with the reed switch. The magnetic field pulls two tiny metal pieces inside the glass tube together, which instantly completes the electrical circuit.
Why the Design Matters
The bottom line is that the magic happens overall without any mechanical friction. Since no parts rub together, these sensors easily last for millions of cycles without wearing out. We manufacture these rugged devices every single day here at 1 LEAP Technologies, and we thoroughly test them to make sure that they will survive in hard industrial environments.
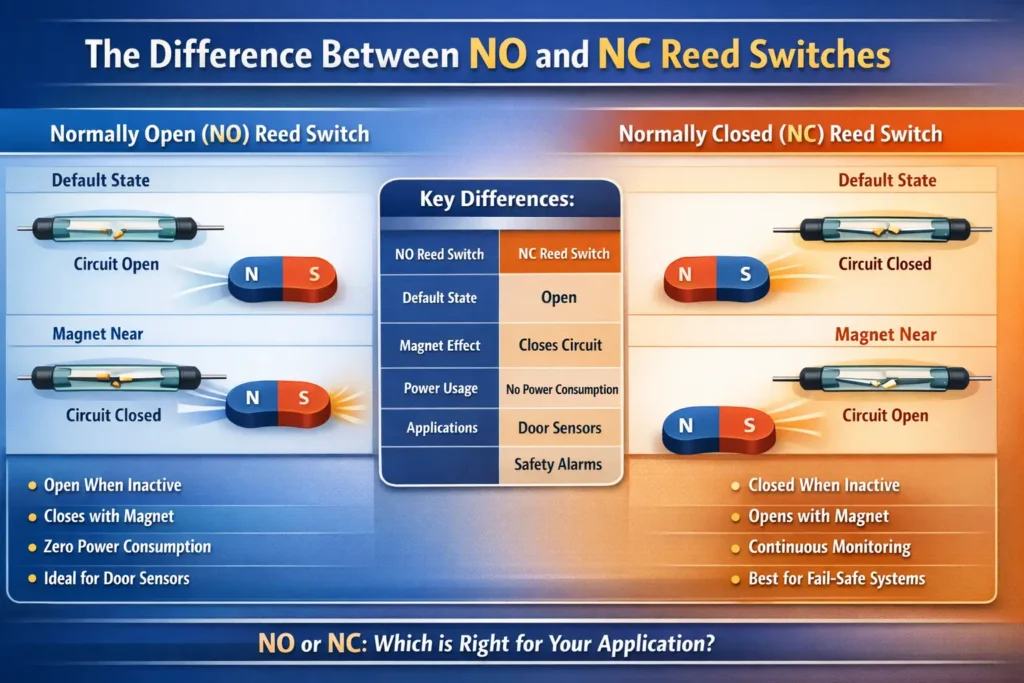
Choosing Your Setup: Normally Open vs. Normally Closed
Here is a quick piece of advice that will save you hours of troubleshooting later. You absolutely must understand how your control panel reads signals before you connect a single wire.
[Door Closed] -> Magnet is Close -> Circuit Completes (NC) -> Alarm is Happy ✅
[Door Opens] -> Magnet Moves Away -> Circuit Breaks (Open) -> Alarm Triggers 🚨
Normally Closed (NC) Circuits
Honestly, about 90% of security systems use a Normally Closed setup. This means that when your door is shut tight, the magnet keeps the circuit closed and electricity flows freely.
Then, if an intruder forces the door open, the magnet moves away, breaks the circuit, and instantly triggers the alarm. Another massive benefit is that if a burglar cuts your security wire, the circuit breaks automatically and sets off the alarm anyway.
Normally Open (NO) Circuits
On the flip side, some specialized automation systems prefer a Normally Open configuration. In this scenario, opening the door actually completes the circuit, which might turn on a courtesy light or activate an air curtain sensor at a shop entrance.
Wiring Your Magnetic Door Sensor to an Air Curtain: Step-by-Step
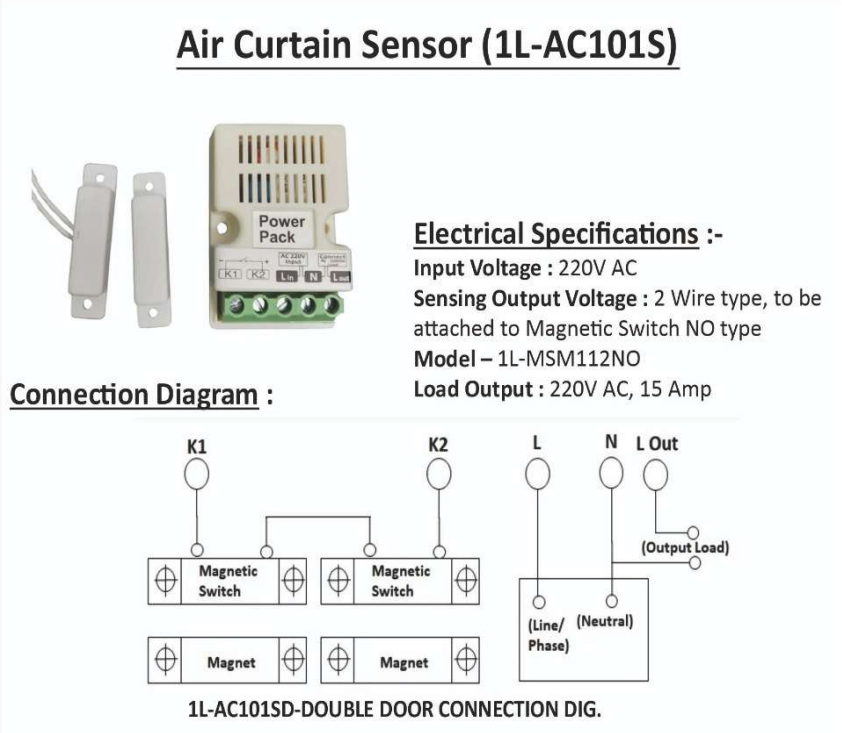
So your air curtain is placed above the entrance — great. Now let’s wire it up correctly using the 1L-AC101S Power Pack, which is specifically designed to work with our magnetic reed switches right out of the box.
Understanding the Signal Flow
The 1L-AC101S uses a dedicated Power Pack unit that sits between your magnetic door switch and the air curtain motor. It handles the heavy 220V AC load switching internally, so your magnetic switch only ever carries a clean, low-stress signal through its two sensor wires.
The unit runs on a Normally Open (NO) configuration, using the 1L-MSM112NO magnetic switch model. Here is the exact logic:
[Door Opens] -> Magnet Moves Away -> NO Circuit Closes -> Power Pack Triggers -> Air Curtain ON ✅
[Door Closes] -> Magnet Returns -> NO Circuit Opens -> Power Pack Resets -> Air Curtain OFF 🔄
What You Will Need
- Your 1 LEAP Technologies magnetic door contact switch kit.
- 1L-AC101S Air Curtain Sensor Power Pack
- 1L-MSM112NO Magnetic Reed Switch (NO type) — one per door
- 18 to 22 AWG two-conductor wire for the sensor connection
- Standard 220V AC mains supply cable for power input
- Wire strippers and a small flathead screwdriver
Understanding the Terminal Block
The Power Pack has five clearly labelled terminals on its front face:
[ K1 ] [ K2 ] [ L ] [ N ] [ L Out ]
- K1 — Sensor input terminal for Door 1 magnetic switch
- K2 — Sensor input terminal for Door 2 magnetic switch (double door setups)
- L — Mains Line / Phase input (220V AC)
- N — Mains Neutral input (220V AC)
- L Out — Switched output to air curtain motor (220V AC, 15A)
Single Door Wiring — Step by Step
Step 1 — Mount Your Magnetic Switch Fix the 1L-MSM112NO reed switch onto the stationary door frame and secure the magnet onto the moving door leaf. Maintain a gap of less than half an inch between both components for reliable triggering.
Step 2 — Connect the Magnetic Switch to K1 Run your two-conductor wire from the magnetic switch back to the Power Pack. Connect:
[Magnetic Switch — Wire 1] ————→ [Power Pack Terminal K1 — Left Pin]
[Magnetic Switch — Wire 2] ————→ [Power Pack Terminal K1 — Right Pin]
Note: Polarity does not matter here. The magnetic switch is a simple dry contact — either wire can go to either pin on K1.
Step 3 — Connect Mains Power Input Wire your 220V AC mains supply into the Power Pack:
[Mains Line / Phase] ————→ [Terminal L]
[Mains Neutral] ————→ [Terminal N]
Critical Safety Warning: Always isolate the mains supply at the breaker before connecting L and N terminals. These carry live 220V AC voltage. If you are not a licensed electrician, have a qualified professional handle this step.
Step 4 — Connect the Air Curtain Output Run your output cable from the Power Pack directly to the air curtain motor’s power input:
[Terminal L Out] ————→ [Air Curtain Motor — Line Input]
[Terminal N] ————→ [Air Curtain Motor — Neutral Input]
The L Out terminal delivers a switched 220V AC, 15 Amp output. Every time K1 detects the door opening, L Out activates and powers the curtain instantly.
Testing Your Completed Installation
[Door State] [K1 Terminal] [Air Curtain]
Closed Open Circuit OFF — Standby
Open Closed Circuit ON — Full Airflow
- Close both doors fully and confirm the air curtain remains off
- Open Door 1 alone and confirm the curtain kicks on instantly
- Close Door 1 and confirm the curtain shuts off cleanly
- Repeat the same test for Door 2 on double door setups
Common Wiring Mistakes to Avoid
Think about the last time you walked into a large grocery store or a climate-controlled warehouse. Did you notice a sudden blast of air above your head? That blast happens because a magnetic door sensor detected your entry and instantly kicked on an air curtain sensor.
Using the wrong switch type — The 1L-AC101S is specifically designed for NO type magnetic switches only. Wiring an NC type switch into K1 or K2 will keep your air curtain running permanently with no way to shut it off short of cutting the power.
Overloading the L Out terminal — The output is rated at 15 Amp maximum. Always check your air curtain motor’s rated current draw before connecting. Exceeding 15A risks burning out the Power Pack relay internally.
Running sensor wire alongside mains cables — Keep your K1 and K2 sensor wires physically separated from the L, N, and L Out mains cables inside any conduit. Mixing low-signal and high-voltage wiring in the same run introduces interference that causes phantom triggering.
Skipping the gap check after mounting — Even a perfectly wired system fails if the magnet sits more than half an inch away from the reed switch on K1 or K2. Always verify alignment after mounting both door components, especially on heavy commercial doors that can flex slightly under load.
This smart integration keeps the conditioned air inside, blocks outdoor dust, and slashes commercial energy bills by
- 12+ Years Manufacturing Experience
- Industrial-Grade Reliability
- 93% Reduction in False Alarms
- Energy-Saving Automation
- Millions of Proven Duty Cycles
- Seamless System Integration
Why 1 LEAP Technologies Makes a Massive Difference
Look, we know you have choices when sourcing hardware for your next big project. But over the last 12 years, 1 LEAP Technologies has perfected the art of manufacturing ultra-reliable magnetic reed switches that simply refuse to quit.
We don’t just assemble parts; we hardly engineer and test our sensors to make sure that they survive millions of open-and-close cycles without a single glitch. Our industrial clients love us because our components drastically reduce expensive maintenance callbacks.
If you are currently planning a large-scale commercial installation or need rugged, reliable sensors for your business, we should absolutely talk.
What would you like to do next?
Common Installation Mistakes (And How to Avoid Them)
Even seasoned pros mess up these installations sometimes because they overlook the little things. Let’s make sure you don’t fall into the same traps.
Installing Directly on Ferrous Metal Doors
First, never screw a magnetic switch directly onto a steel door frame without using a non-magnetic spacer. The steel frame will instantly steal the magnetic field away from your reed switch sensor, causing your system to completely lose track of whether the door is open or closed. Always use plastic or wood spacers to insulate the magnet from raw sheet metal.
Neglecting the Total Wire Run Length
Second, keep an eye on how much wire you are running across your facility. Extremely long cable runs introduce electrical resistance that can mimic an open door to your control panel.
The bottom line is that if your wire run stretches past 500 feet, you need to use a thicker gauge wire to keep your signals loud and clear.
Testing Your New Magnetic Switch Like a Pro
Now that everything is mounted and wired up, it is time to verify your hard work. You don’t want to find out something is broken during a real security emergency.
[Door State] [Multimeter Reading] [System Status]
Closed 0.00 Ohms (Short) Safe / Armed
Open Infinite (OL / Open) Alarm Triggered
- Set Up Your Tool: Flip your digital multimeter over to the continuity or resistance setting.
- Check the Closed State: Hook the tester leads up to your switch wires while the door is completely closed. You should hear a continuous beep or see a resistance reading close to zero ohms.
- Check the Open State: Swing the door wide open. The beep should stop instantly, and your screen should read infinite resistance.
Conclusion
Wiring a magnetic door sensor doesn’t require a fancy engineering degree or decades of training. You just need to choose the right setup, mount your components with a clean and tight gap, and secure your wiring connections properly.
So, go ahead and tackle that installation with total confidence. If you run into a weird edge case or need a massive batch of high-grade sensors that won’t let you down, you know exactly where to find us.