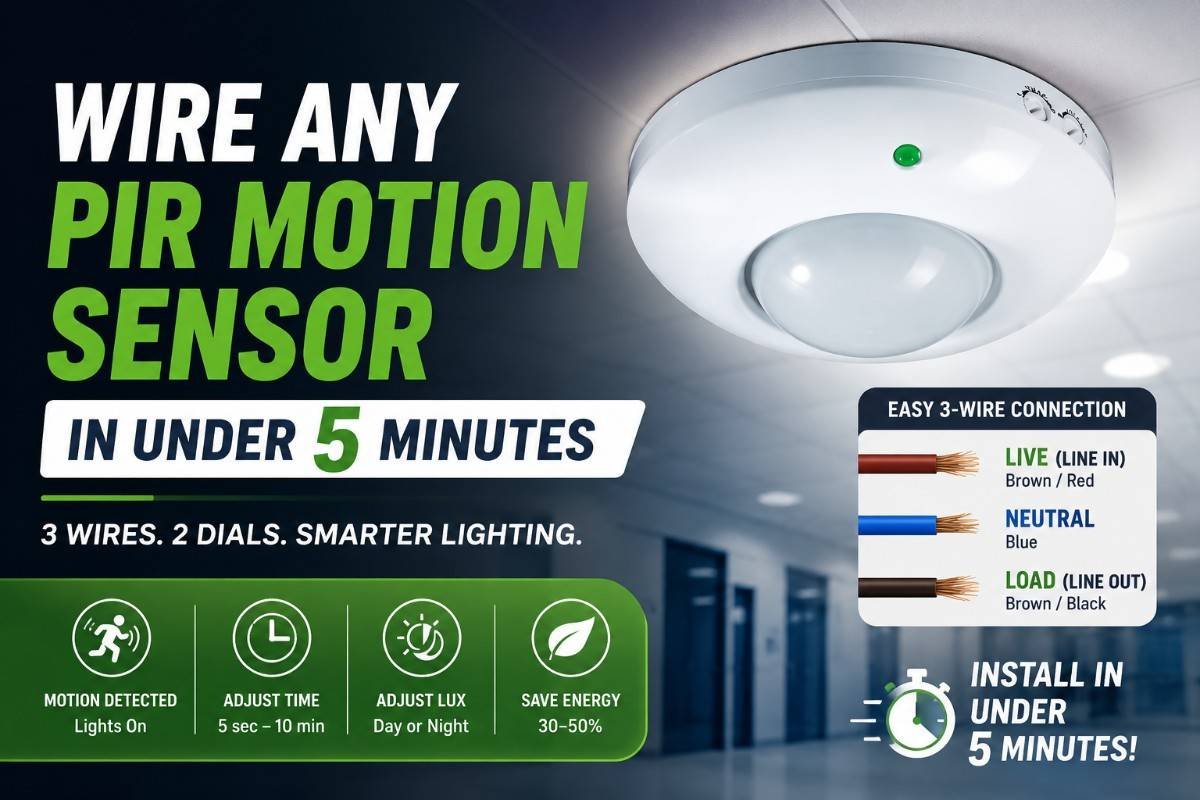
Yes, you can wire a PIR motion sensor by yourself at any time — even if you’ve never touched any type of wire before. Connect three wires (Live, Neutral, Load), adjust two dials, and your sensor is live. That’s it. At 1 LEAP Technologies, we deals in some of the most safe PIR motion sensor detectors on the market — and we’ve helped hundreds of customers in getting their units running without calling an electrician. Our sensors work right out of the box. No complicated and huge manuals. No YouTube videos to see. Just three wires and you’re done.
Quick fact: Buildings which are using PIR motion sensor detectors for lighting control cut electricity use by 30–50%. A 2023 U.S. Department of Energy report found that occupancy-sensor-controlled lighting saves an average of 24% energy in office spaces and up to 60% in restrooms and storage rooms.
Why Most People Get This Wrong (And How to Avoid It)
Honestly, the wiring part is not the toughest part. The toughest part is understanding that which wire goes to where. People majorly see three or four coloured wires coming out of a PIR detector and freeze.
So here’s the deal — every standard PIR motion sensor has the same basic wiring logic. Once you get this, you can wire any sensor in the range. Let’s break it down to make it simple to understand
Explore In Depth: The Wiring Of 1L-PS01 – Ceiling Mount PIR Sensor 360°
This is our PIR sensor for ceiling installation — the 1L-PS01. It gives you a full 360° detection radius. Perfect for rooms, warehouses, and corridors. And yes, the wiring is simple. Let me walk you through it step by step.
What You See When You Open the Box
You get the sensor unit, a base plate, and three wires stick out from it. Sometimes a tiny screwdriver. That’s literally it. No scare circuit boards staring at you. Just three wires.
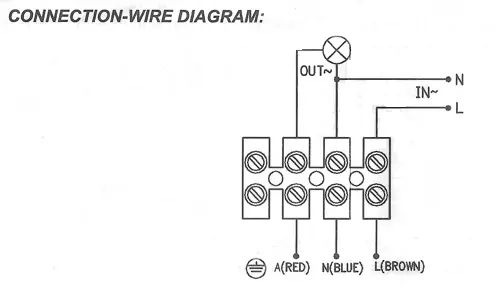
The Three Wires — Here's Exactly What Each One Does
Wire 1 → LIVE (Line In) — Brown or Red wire
This is your incoming power. You connect this to the Live wire coming from your main electrical supply. Think of it as the wire that “feeds” the sensor.
Wire 2 → NEUTRAL — Blue wire
Connect the blue wire to the Neutral line. Standard. This completes the circuit for the sensor itself.
Wire 3 → LOAD (Line Out) — Also Brown/Red (sometimes Black)
This is the output wire. Connect this to your light fixture or whatever load you want the sensor to control. When motion is detected, the sensor closes the circuit on this wire and your load switches on.
Step-by-Step Wiring for the 1L-PS01
Step 1 — Kill the power.
Go to your circuit breaker and switch off the circuit you’re working on. Always. No exceptions. Safety first, every time.
Step 2 — Mount the base plate.
Screw the base plate to your ceiling at the desired location. Make sure your wires are accessible through the center hole.
Step 3 — Connect Live (Line In).
Take the brown/red wire from your ceiling supply and connect it to the brown/red wire on the 1L-PS01 (Live terminal). Twist and cap, or use the terminal block inside if provided.
Step 4 — Connect Neutral.
Blue to blue. Connect the neutral wire from the supply to the blue wire on the sensor. Simple.
Step 5 — Connect Load.
Take the output wire (brown/black) from the sensor and run it to the Live terminal of your light fixture. The neutral for the fixture connects directly to your main neutral — not through the sensor.
Step 6 — Tuck and close.
Fold the wires neatly. Clip the sensor body onto the base plate. It snaps right in.
Step 7 — Power up and test.
Switch the breaker back on. Walk under the sensor. Your light should trigger. Done.
Now Adjust the Two Dials — This Part People Always Miss
Flip the sensor over or look at the side — you’ll see two small potentiometer dials.
Dial 1 — LUX (Light Sensitivity)
This controls when the sensor activates based on ambient light. Turn it fully anti-clockwise (towards the moon icon) to activate in complete darkness only. Turn clockwise if you want it working even in daylight.
Dial 2 — TIME (How Long the Load Stays ON)
This sets the delay before the sensor switches off after motion stops. Ranges from 5 seconds to around 8–10 minutes depending on the model. For factory floors, 1–3 minutes works great. For toilets or storerooms, 30 seconds to 1 minute is fine.
🔌 Ready to wire yours up? The 1L-PS01 is available now at 1 LEAP Technologies. Check out our full PIR Sensor range and get the right sensor delivered fast. → Browse PIR Sensors at 1leaptechnologies.com
Key Features & Benefits of the 1L-PS01 PIR Motion Sensor
- 360° full-room detection → No blind spots. One unit covers an entire room up to 6–8m diameter. Proven in factory and office setups where multiple sensors used to be needed.
- Adjustable time delay (5 sec – 10 min) → You can control how long lights stay on. Saves serious electricity, especially in high-traffic industrial zones.
- Adjustable LUX sensitivity → Works only when it is needed. It Won’t trigger at noon if you don’t want it to. Reduces needless switching cycles.
- Ceiling mount design → Out of reach means tamper-proof. Nobody accidentally knocks it, and coverage stays consistent.
- Compact, low-profile body → Fits standard ceiling knock-outs. No special housing needed.
- Works with LED, CFL, and incandescent loads → No compatibility headaches. Plug into your existing lighting setup.
- Made-in microwave-free passive detection → No RF emissions. Safe for offices, schools, hospitals.
- Easy snap-on base plate → Installation takes under 5 minutes. No tools beyond a basic screwdriver.
- Low standby power draw → The sensor itself uses minimal power. The energy savings from the controlled load far outweigh it.
- Wide input voltage range → Compatible with standard 220–240V AC installations overall India and most international markets.
Who This PIR Sensor Is Perfect For — And Who Should Look Elsewhere
This Is for You If…
- You run a factory, warehouse, or workshop and hate paying for lights left on all day.
- You can manage office spaces and want hands-free lighting in corridors, toilets, and conference rooms.
- You’re an electrician or contractor who needs reliable, easy-to-install PIR and motion sensor
- You want to automate motion sensor lights without expensive smart-home systems.
- You’re setting up a retail space, parking lot, or stairwell where compatible detection matters.
Maybe Look Elsewhere If…
- You need outdoor detection in hard rain/dust environments — check our 1L-PS08 (IP65 rated, weatherproof) instead.
- You need a wall-mounted unit for corridors — the 1L-PS10 with 180° detection suits that better
- You need integration with a complex BMS/smart building system — you might need a DALI or KNX-compatible sensor instead.
Quick Overview: Other PIR Motion Sensors in the 1 LEAP Range
The wiring diagram is basically the same all over our PIR sensors — Live In, Neutral, Load Out. So once you’ve done the 1L-PS01, you’re set for all of them. Here’s a fast rundown of the others:
Model | Type | Best For |
|---|---|---|
1L-PS01 | Ceiling Mount 360° | Open rooms, halls, offices — full coverage from above |
1L-PS02 | False Ceiling Mount 360° | Drop ceilings in commercial spaces — sits flush with tiles |
1L-PS08 | Outdoor, covered porches, loading docks, harsh environments | |
1L-PS10 | Wall Mount 180° | Corridors, stairwells, narrow spaces — mounted at 1.2–2m height |
1L-PS012 | Ceiling Mount 360° | Similar to PS01 with updated detection range specs |
Real Results: What PIR Motion Sensors Actually Do for Factory Owners
Check this out — these aren’t for only making-up numbers. These are published figures from energy audits and industrial case studies:
- A 2022 Bureau of Energy Efficiency (BEE) India study found that factories using PIR-based occupancy sensors for lighting reduced energy consumption by an average of 38% in production floors.
- In the US, Lawrence Berkeley National Laboratory data shows occupancy sensor-controlled lighting saves $0.15–$0.30 per sq. ft. per year in commercial buildings.
- A textile factory in Surat reported savings of ₹2.4 lakh per year in electricity after retrofitting 120 ceiling mount PIR sensor over their plant — payback period was under 8 months.
- According to IEA (International Energy Agency), lighting accounts for 15% of global electricity consumption. PIR and motion sensor automation is one of the fastest ROI retrofits available.
- A warehousing company in Pune cut security lighting costs by 55% simply by replacing always-on lamps with PIR motion sensor detector-controlled units along perimeter walls.
The bottom line is — these sensors pay for themselves fast. Especially in factories and warehouses where lights run 12–16 hours a day whether someone’s there or not.
PIR Sensor vs Competitors — Quick Comparison 2026
What Customers Are Saying
Honestly, this is the part that matters. Here’s what real customers said after installing our PIR sensors:
“Installed 40 units of the 1L-PS01 all over our garment factory. The wiring took my electrician about 3 minutes per sensor. Total electricity savings in the first month — 31%. Absolutely worth it.”
— Ramesh K., Factory Owner, Tiruppur, Tamil Nadu
“We had lights running 24/7 in our warehouse corridors. Put in 1L-PS10 wall-mount sensors. Now they only turn on when someone walks through. Saved us about ₹18,000 last month alone.”
— Priya M., Operations Manager, Bhiwandi, Maharashtra
“The false ceiling version (1L-PS02) fitted perfectly in our office. Zero modifications needed. And the 360° coverage means one sensor handles our entire conference room.”
— Ajay S., Facilities Head, Noida, UP
“I was worried about the outdoor units for our loading bay. The PS08 weatherproof PIR motion sensor has been running through two monsoons with zero issues.”
— Suresh P., Plant Manager, Pune
💡 Want to see which sensor fits your space? Chat with our team at 1 LEAP Technologies — we’ll tell you exactly which model you need in 2 minutes. No hard sell. Just straight advice.
Frequently Asked Questions
Do I need an electrician to install a PIR motion sensor?
No — not for basic installations. If you’re comfortable in knowing how to switching off a breaker, identifying Live/Neutral wires, and using a screwdriver, you can wire a PIR sensor by yourself. The 1L-PS01 connects it in three wires. That said, always switch off the circuit before touching any wiring. If your installation includes a consumer unit or DB board, call an electrician.
What's the wiring diagram for a standard PIR sensor?
Simple. Live In → L terminal on sensor. Neutral → N terminal. Load Out → connects to the Live side of your light/device. Neutral for the load goes directly from the supply, not through the sensor. That’s the standard 3-wire PIR wiring diagram. Every sensor in our range follows this layout.
Can I use a PIR motion sensor to control LED lights?
Yes, absolutely. All sensors in the 1 LEAP range are compatible with LED, CFL, and incandescent loads. Just check the watt rating on the sensor spec sheet. For example, the 1L-PS01 handles loads up to 1200W. An LED light draws far less than that — you’re good.
What's the difference between a PIR sensor and a motion sensor detector?
A PIR (Passive Infrared) sensor is a type of motion sensor. It detects movement by sensing changes in infrared radiation — basically, body heat moving through its field. So all PIR sensors are motion sensors, but not all motion sensors are PIR. Microwave sensors, ultrasonic sensors, and dual-tech sensors are the other types. PIR is the most common for lighting control because it’s reliable, cheap, and easy to install.
How do I stop the PIR sensor from triggering in daylight?
Turn the LUX dial anti-clockwise (towards the moon icon). This tells the sensor to only activate when ambient light drops below a set threshold. So it won’t fire during the day when natural light is sufficient. Adjust it until it only triggers at the darkness level you want.
Is the 1L-PS08 really weatherproof for outdoor use?
Yes. The 1L-PS08 carries an IP65 rating, which means it’s fully protected against dust ingress and low-pressure water jets from any direction. It handles Indian monsoon conditions without any issues. Just don’t submerge it.
Can one PIR sensor cover an entire room?
Yes, if you use a 360° ceiling mount model like the 1L-PS01 or 1L-PS02. These cover a detection radius of up to 6–8 metres from directly below the sensor. For larger rooms, you’d install multiple units. For corridors and narrow spaces, the 180° wall-mount 1L-PS10 works better.
Where does 1 LEAP Technologies supply these sensors?
1 LEAP Technologies operates as an authorised dealer for this range of PIR sensors all over India. We supply to factories, commercial buildings, contractors, and retail spaces. Orders ship pan-India. Check our website or reach out directly for bulk pricing.
Ready to Stop Paying for Empty Rooms?
You now know exactly how to wire a PIR sensor. Three wires. Two dials. Five minutes. No experience needed.
The 1L-PS01 is the easiest ceiling mount PIR motion sensor on the market. And as an authorised dealer, 1 LEAP Technologies stocks the full range — from the basic 360° ceiling unit to the outdoor IP65-rated weatherproof PIR sensor.
So here’s the deal — if you’re running a factory, warehouse, office, or retail setup and still paying for lights in empty rooms, you’re just burning money. The fix is a ₹300–₹800 sensor and 5 minutes of your time.
👉 Browse the full 1 LEAP PIR Sensor range at 1leaptechnologies.com | Call us for bulk pricing & dealer support
- Same-day dispatch available on in-stock models
- Bulk discounts for orders of 10+ units
- Technical support available for wiring queries — just call or WhatsApp us