You’re sitting at your desk, deep in work. Then — click. The lights go off.
You wave your arms like a madman. The lights come back on. You sit down. Two minutes later? Click. Darkness again.
Sound familiar? Yeah. This is the most frustrating thing about a poorly set up occupancy sensor. And honestly, it happens way more often than it should — not because the sensor is broken, but because nobody told you how it actually works.
So here’s your short course. No boring manuals. Just answers from the team at 1 LEAP Technologies, your go-to dealer for the 1L-PS041 PIR Occupancy Sensor and other smart sensing solutions.
Let’s fix this, one problem at a time.
Problem 1:The Lights Keep Switching Off While You're Still There
This is the big one. The classic. The reason you Googled this post.
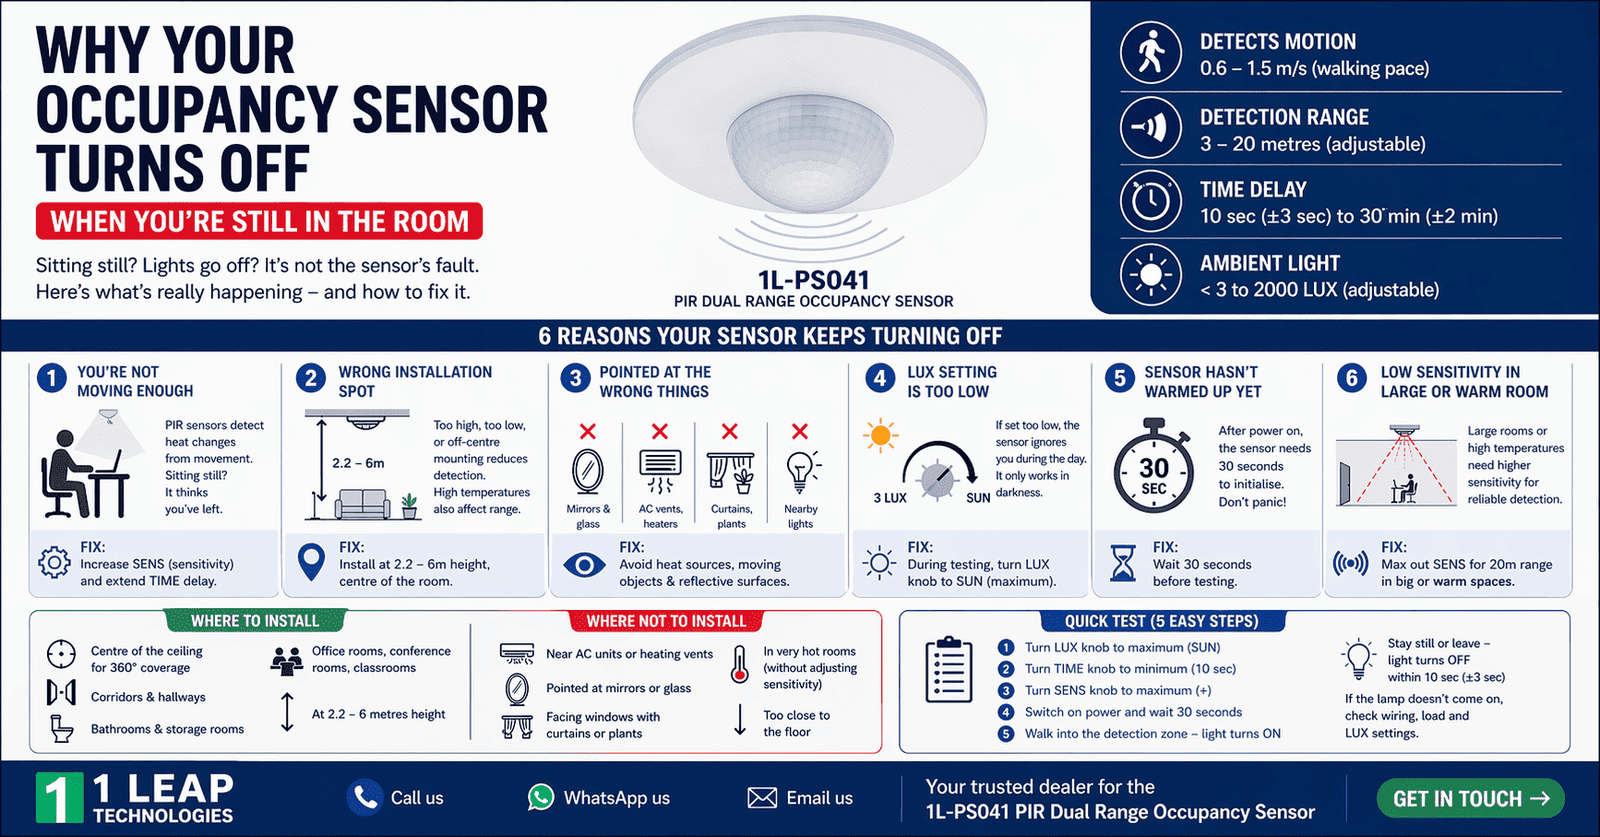
Here’s what’s happening: your occupancy sensor uses PIR technology — Passive Infrared. It detects heat movement from your body. So when you’re sitting still (reading, typing, watching something), the sensor thinks the room is empty and kills the lights.
The fix? Check your TIME knob. The 1L-PS041 has a time delay range from a minimum of 10 seconds (±3 sec) to a maximum of 30 minutes (±2 min). If yours is set too low, it’ll cut out fast.
So turn the TIME knob towards the 30-minute side. Give yourself more barrier. Also — and this is key — the sensor uses additive time delay. Meaning every time it catches a new signal while still in the first countdown, it resets the timer from scratch. So the more it sees you move, the longer it stays on.
Anyway, the easiest fix is bumping up that time delay. Done.
Problem 2: The Sensor Doesn't Detect You at All — Even When You Walk In
You walk into the room. Nothing. The lights stay off. You wave at the ceiling sensor like you’re welcoming a cab.
This is a sensitivity problem, not a broken sensor.
The fix? The 1L-PS041 Occupancy Sensor — meaning you can adjust its detection range between 3 meters (low sensitivity) and 20 meters (high sensitivity). If SENS is set too low, it’ll only react when you’re standing directly under it.
Turn the SENS knob clockwise to increase sensitivity. For large rooms or offices, crank it up towards the max (+). For smaller spaces like a bathroom or storage area, keep it moderate so it doesn’t false-trigger.
Also check your installation height. This sensor works best between 2.2 to 6 meters from the floor. Too high or too low? Detection goes sideways.
Problem 3 The Light Doesn't Turn On During the Day — Even When Someone's in the Room
You installed the sensor. Everything is looking fine. But during daylight hours, the lamp just… doesn’t respond. People walk in. Nothing.
Check this out — this is actually a feature, not a bug. But only if it’s set right.
The fix? The sensor has a LUX knob that controls ambient light sensitivity. When set to the minimum position (marked “3”), the sensor only activates when ambient light drops below 3 LUX — that’s basically near-dark conditions. So during the day when natural light is flooding in, the sensor purposely holds off.
If you want the light to work in any condition — day or night — turn the LUX knob clockwise to the maximum position (SUN). That’s the setting that makes it work regardless of how bright it already is outside.
Quick heads up from 1 LEAP Technologies: if you’re doing a test run during daylight, make sure the LUX knob is on SUN. Otherwise you’ll think the sensor is broken when it’s just doing its job.
Problem 4: The Sensor Keeps Triggering Randomly — Even When the Room Is Empty
Okay, this one freaks people out. You’re sitting in another room, and suddenly the lights in the empty room flicker on. Ghost? Nope. Misbehaving sensor.
A PIR occupancy sensor works by detecting infrared energy — basically body heat and movement. So anything warm that moves? It might pick it up.
The fix? The installation manual is pretty clear on this: avoid these situations at all costs.
- Don't point the sensor at mirrors or reflective surfaces. Reflections confuse the detector.
- Don't install it near heat sources like heating vents, air conditioning units, or exposed light fittings. The temperature change mimics a human presence.
- Don't aim it at curtains, tall plants, or anything that flow in a breeze. Wind-moved objects look like people to a PIR sensor.
Honestly, most random-trigger problems trace back to one of these three. Do a quick check of what’s in the sensor’s line of sight. Reposition if needed.
Also, the detection motion speed for this sensor is 0.6 to 1.5 m/s — slow, human-paced movement. Fast-moving objects like a fan blade? Might not trigger it correctly. Slow-swaying curtains near a vent? That’s your offender, because occupancy sensor will detect is a aa person and turn on the light.
💡 Thinking about upgrading your space? The 1L-PS041 Dual Range Occupancy Sensor by 1 LEAP Technologies manages all of these things right out of the box — with adjustable TIME, SENS, and LUX settings that you can do it in yourself. No electrician needed for these adjustments. Reach out to 1 LEAP Technologies today and let’s get your space sorted.
Problem 5: The Sensor Works, But the Load (Light/Fan) Doesn't Turn On
The sensor is detecting. The indicator behaves correctly. But the connected light or fan?is not working.
This is a wiring problem, a load problem, or a settings mismatch. Let’s break it down.
The Fix — Three Things to Check
First, verify the connection is correct. The 1L-PS041 has a maximum rated load of 2000W for incandescent bulbs and 1000W for other load types. If your connected device are above of these ranges, the sensor can’t handle it, as it is out of the sensor power. Downsize the load or use a relay.
Then, check whether the power supply is actually reaching the sensor. Make sure the circuit is live and the wiring are connected according to the connection-wire diagram from the manual.
Also, double-check the LUX setting again. If the ambient light is above the edge you’ve set, the sensor purposely won’t trigger the load — even if it detects motion. Adjust accordingly.
The bottom line is — if your load isn’t working, run through power, wiring, and light-level settings in this case. Nine times out of ten, it’s one of these three.
Problem 6: The Sensor Worked Fine at First, But Now It's Inconsistent
This one comes up slowly. The sensor was great for the first few weeks. Now it’s hit or miss. Sometimes the lights come on, sometimes it doesn’t.
Welcome to the ambient temperature problem.
The fix? PIR sensors detect differences in infrared energy between a moving body and the background. So when the ambient temperature rises to levels close to human body temperature (around 36–37°C), the contrast decreases — and the sensor starts struggling to work properly.
The 1L-PS041 has a working temperature range of -20°C to +40°C, and its detection distance is rated at less than 24°C. In hotter climates (yes, like Indian summers), the sensor’s effective range can decreases significantly.
So if your sensor is acting up during peak summer afternoons, that’s why. Here’s what you can do:
- Lower the installation height slightly to bring it closer to the detection zone.
- Increase sensitivity (SENS) to repay for the reduced thermal contrast.
- Avoid installing the sensor near south-facing windows where heat builds up.
Honestly, this is the most underrated problem with occupancy sensors — and almost nobody talks about it.
Where Should You Actually Install an Occupancy Sensor? (And Where Not To)
Let’s talk placement. Because half of the problems come down to putting the sensor in the wrong placement, and then when it’s not working, peoples start blaming sensor.
Good spots to install:
- Centre of the ceiling in the room — gives the full 360° detection range it’s designed for.
- Height between 2.2 and 6 meters — this is the sweet spot for the 1L-PS041.
- Large open rooms — offices, warehouses, classrooms. This is where the Dual Range Occupancy Sensor shines — detection up to 20 metres in high-sensitivity mode.
- Corridors and hallways — motion is constant and clear; the sensor handles it perfectly.
Bad spots — avoid these:
- Near air conditioning units or heating vents — temperature fluctuations confuse the sensor
- Pointed toward mirrors or glass panels — reflected infrared causes false readings
- Facing windows with curtains or plants — wind-driven movement triggers false occupancy signals
- In very hot rooms without adjusting sensitivity — high ambient temps reduce detection accuracy
- Too close to the floor — the detection cone won’t cover the space properly
Also — and the manual is clear about this — always have a professional electrician handle the wiring. The sensor runs on 220–240V/AC. That’s not DIY territory. Disconnect the power before installation, cover any live adjacent components, and make sure the device can’t be accidentally switched on during the process.
One Last Thing Before You Go
Look, the 1L-PS041 is genuinely a solid piece of kit. It’s a Dual Range Occupancy Sensor with adjustable sensitivity, time delay, and ambient light control — all in one ceiling-mounted unit. It handles 2000W of load, works in humidity up to 93% RH, and consumes only about 0.5W itself.
Most of the problems that people face aren’t hardware failures. They’re the setup mismatches. A wrong LUX setting here. A low TIME delay there. A sensor pointed at a heat vent by mistake.
So before you decide the sensor is faulty — run through this list. Adjust the TIME, SENS, and LUX knobs one at a time. Check the installation spot. Make sure the wiring is clean and correct.
The bottom line is — this sensor is smart enough to handle your space. You just have to tell it how.
📦 Ready to get the right sensor for your space? At 1 LEAP Technologies, we don’t just sell occupancy sensors — we help you pick the right one, set it up correctly, and sort out any issues along the way. Whether it’s a home office, a warehouse, or a commercial building, we’ve got you covered. Contact us today and let’s make your space smarter.