That Wiring Diagram Is Staring at You. You're Staring Back.
You open the sensor for installation. And there is a diagram with terminals labeled L, N, N, and L’. An arrow. A load symbol. A warning box that says “Danger of death through electric shock.”
Look, you’re not the first person who got stuck at this point. And honestly? The diagram isn’t that complicated that it looks, once someone breaks down It into simple steps. That’s exactly what we’re doing here just a direct guide of what that wiring diagram is actually telling you.
First, Understand the Four Terminals
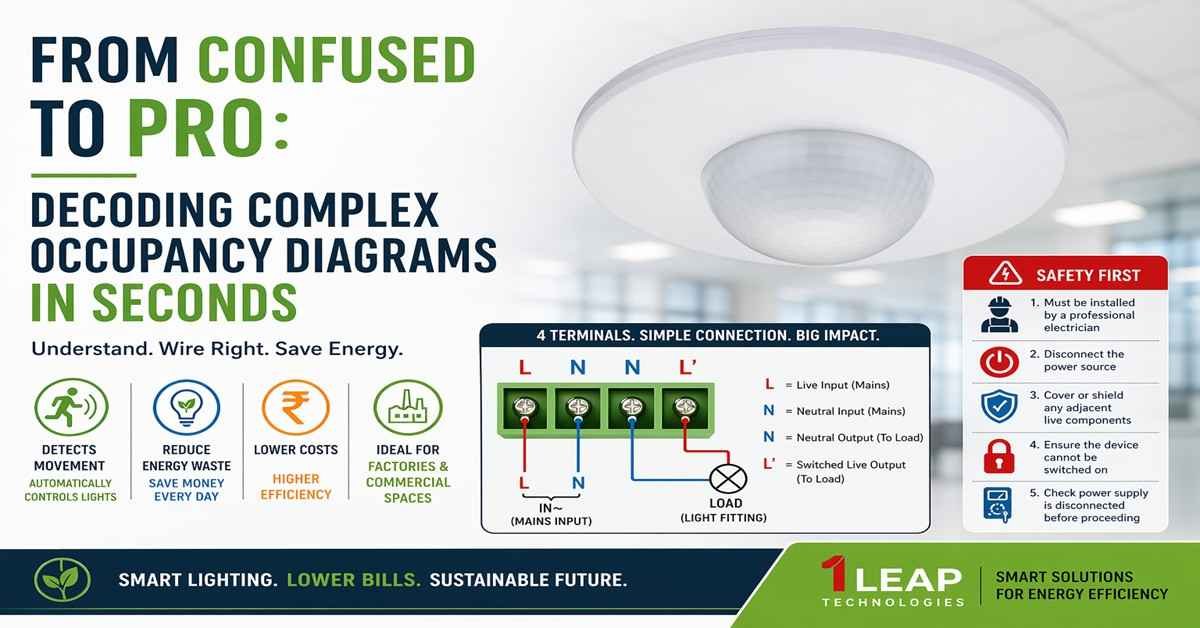
Check this out — the whole diagram comes down to four terminals. Just four. That’s it. Here they are: L, N, N, and L’
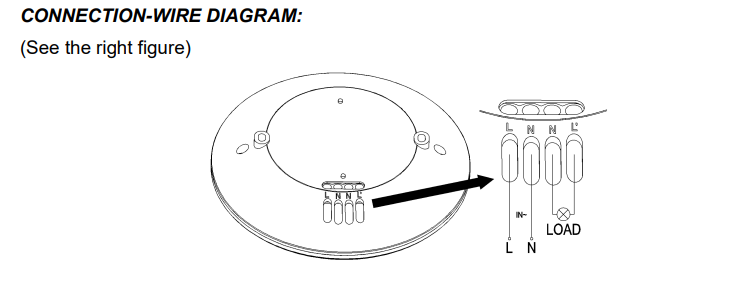
They are right at the bottom of the sensor body. The diagram zooms in on them with a large view — that’s the arrow pointing from the sensor base to the expanded terminal block. The manufacturer did that so you don’t have to confuse.
Each terminal has a job. None of them are interchangeable. Mix them up and things go wrong. So here’s what each terminal means:
L — This Is Your Live Incoming Wire
L stands for Line. This is where your incoming live (hot) wire connects.
Think of this as the “power enters here” terminal. Your mains power — the live feed from your electrical supply — plugs into this point. No live wire here means the sensor doesn’t power up at all.
N — This Is Your Neutral (Incoming)
Right next to L, you’ve got the first N terminal.
This is your neutral wire from the mains supply. The live and neutral together complete your input circuit. The occupancy sensor needs both to function — it draws a small amount of power to run its internal electronics parts even when the lights are off.
N — The Second N Terminal
Yes, there are two N terminals. No, that’s not a typo on the diagram.
The second N acts as a pass-through neutral — it connects out to your load (your light fitting or connected device). So the sensor takes neutral in on one N terminal and sends it out through the other N terminal toward the fixture. The load needs a neutral too, and this is how it gets one.
Honestly, this is the part that confuses most people. Two Ns side by side look like a duplicate. They’re not. One is input neutral. One points to the load neutral.
L' — The Switched Output to Your Load
This last terminal — L’ — is where the magic happens.
L-prime is the switched live output. When the occupancy sensor detects movement, it closes its internal relay and sends live power out through this L’ terminal to your light fixture or load. No occupancy detected? The relay stays open. L’ stays dead. Lights stay off.
So the full picture looks like this: mains power comes in through L and N → the sensor monitors for movement → when it detects someone, it pushes switched live out through L’ and neutral through the second N → your load powers up. That’s the entire circuit. Right there.
Reading the Diagram's Load Symbol
On the right side of the expanded terminal diagram, you’ll notice a circle with an X inside it. That’s your load symbol — in this case, representing a light fitting or lamp.
Two wires connect to it. One comes from L’ (the switched live). The other comes from the second N terminal (neutral). Together, those two wires complete the circuit for whatever you’re controlling.
Also — below the terminal block on the diagram, you’ll see the label IN~ with L and N marked underneath. That’s your mains input confirmation. The tilde (~) means alternating current. So this occupancy sensor runs on AC mains — not DC, not battery. Standard mains supply.
The bottom line is: power goes in from the bottom (L and N mains), switched power comes out through L’ to the load, neutral passes through to the load via the second N. Clean loop. No puzzle.
Read This Before You Touch Anything
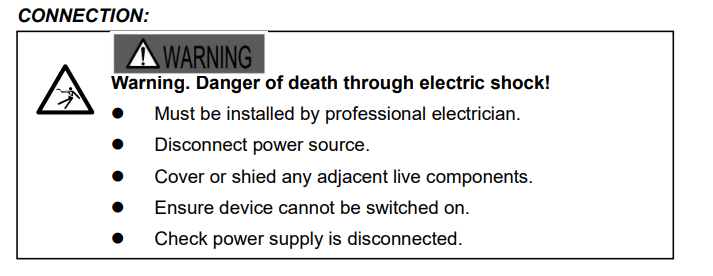
"Danger of death through electric shock."
The diagram includes five specific safety rules — and every single one of them matters before you start connecting any wire to any terminal.
Rule 1: Must Be Installed by a Professional Electrician
This occupancy sensor connects directly to mains voltage. We’re talking 230V AC in most cases. That level of voltage doesn’t forgive mistakes.
So if you’re not an experienced electrician — or you don’t have one standing next to you — stop here. Get a qualified professional first.
Rule 2: Disconnect the Power Source
Before you touch any terminal, the power must be off. Not “probably off.” Not “the switch is down.” Fully isolated at the breaker or fuse board.
The diagram makes this the very first action item for a reason. Live terminals look identical to dead ones. You cannot tell the difference by looking. Always isolate first.
Rule 3: Cover or Shield Any Adjacent Live Components
Even after you cut power to the circuit you’re working on, other live components nearby might still be energized. Cover them. Use insulating tape, rubber shields, or blanking covers.
Check this out — this rule exists because electricians get injured not by the circuit they’re working on, but by the live terminal right next to it that they forgot to cover it. Don’t let that be you.
Rule 4: Ensure the Device Cannot Be Switched On
Someone might flip the breaker back on while you’re mid-installation. Lock it out. Tag it out. Use a padlock on the breaker if you have to.
This step protects you from the one thing you can’t control — another person in the building who doesn’t know you’re working on the circuit.
Rule 5: Check Power Supply Is Disconnected
Before your hands go anywhere near those L, N, N, L’ terminals — test the circuit with a voltage tester. Confirm it’s dead. Don’t assume the breaker you flipped is the right one.
Honestly, a non-contact voltage tester costs very little and takes two seconds to use. There’s no good reason to skip this step.2
Why Getting This Right Actually Matters
India Wastes a Lot of Electricity in Factories
India’s factories and industries use almost 57% of all the electricity in the whole country. That number comes from India’s own Energy Statistics report. That’s more than homes. More than offices.
And a big part of that electricity? It goes to lights. Lights that stay ON even when nobody is in the room. Lights burning during lunch breaks. Lights running in empty sections at night. All wasted. All costing money.
So this is exactly where the occupancy sensor comes in. It sees when the room is empty and turns the light off. Simple as that.
The Indian Government Is Pushing This Hard
The Government of India has a department called BEE — Bureau of Energy Efficiency. Their job is to help India in saving electricity.
BEE runs a scheme called PAT — Perform, Achieve and Trade. This scheme tells large factories — “You must cut down your electricity use. Or pay a fine.”
Check this out — in the first round of PAT (2012 to 2015), 478 factories over India took part. Together, they saved 8.67 Million Tonnes of Oil Equivalent in energy. That’s a large number. It also stopped 31 million tonnes of CO₂ from going into the air.
Then in the second round of PAT, the savings went even higher — 14.08 MTOE saved by Indian factories.
Lighting controls like occupancy sensors help factories hit these saving targets every single year.
BEE Now Says You Must Use Automatic Lighting
Also, BEE released something called ECBC 2017 — Energy Conservation Building Code. This is a set of rules for buildings in India.
This rule say that large commercial buildings and factories must use automatic lighting controls. So installing an occupancy sensor — and wiring it correctly like this diagram shows — is not just a good idea in India. In many states, it is required by the government.
How Much Money Does India Save?
The Indian government checked all its energy saving programmes for the year 2022–23. The result? All these energy saving efforts together saved India ₹1,88,312 crores in one year. That number is from BEE’s own official Impact Assessment Report.
Smart lighting with occupancy sensors is one of the tools that helped reach that number.
What Does It Cost a Factory Owner in India?
In India, factories pay around ₹8 to ₹10 per unit of electricity (1 unit = 1 kWh). This differ by state, but that’s the average.
Now think about a medium-sized factory floor. Lights run for 12 hours a day. If even 4 hours out of those 12 are wasted on an empty floor — that’s money gone every single day. Over a full year, that adds up to lakhs of rupees just from lights nobody was using.
One correctly wired occupancy sensor starts cutting that waste from the very first day it’s switched on.
The occupancy sensor in front of you right now? It can save real rupees for real Indian factory owners. But only if it’s wired right — exactly as this diagram shows.
A Quick Word From 1 LEAP Technologies
At 1 LEAP Technologies, we work as dealers of occupancy sensors — and we see installation confusion regularly. Clients call us with exactly the kind of questions this post answers: “What’s the difference between the two N terminals?” or “What does L’ mean?” So we write this content to give you a right answer before you even pick up the phone.
We carry quality occupancy sensor units and we’re here to help you select the right product for your space, your ceiling height, and your load type. The wiring diagram above is standard across the sensor range we supply — so once you understand it once, you understand it for every unit we send your way.
Let's Recap the Whole Thing in 60 Seconds
Now you know everything the diagram is actually saying. Here it is fast:
- L = Mains live input. Power enters here
- First N = Mains neutral input. Completes the input circuit.
- Second N = Neutral output to load. Feeds your light fitting's neutral.
- L' = Switched live output. Goes live when sensor detects occupancy. Controls your load
- Load symbol (circle with X) = Your light fitting or device being controlled
- IN~ label = Confirms AC mains input
- Warning panel = Non-negotiable. Follow all five safety steps before touching any terminal.